Today was bottling day for my "Act of Gourd" pumpkin-spiced ale. I realized I haven't done a bottling blog in a while, so I thought I would provide some insight into how this works.
First off, I know that one question other homebrewers may have would be "why in the world are you still bottling?" A lot of homebrewers keg, and force-carbonate. There are a couple reasons I don't go that route, but the primary one is that I give away a lot of my beer. While I do enjoy drinking my beer, I also enjoy giving bottles out to other folks. In fact, I give away more beer than I drink (even factoring in the beer that others drink with me at my home). I also enjoy bringing beer into work for tastings. Kegs are awful for gifting, and not that great for low-number tasting parties. Yes, you can bottle from a keg, but I find that the conditioning is different, which brings me to carbonation...
I also don't really like the feel of force-carbonation. I find that force-carbonated beer has a different mouthfeel, the bubbles feel bigger, and the head doesn't retain the way I like it. I really like the taste, feel and look of naturally carbonated beer. I know that I could naturally carbonate kegged beer, so those two aren't exactly dependent variables, but as previously mentioned, I prefer bottles anyways, so it all works out best if I bottle and naturally carbonate.
So, having gotten that out of the way, and basing ourselves on the premise that I will be bottling, here's a step-by-step of how I do so...
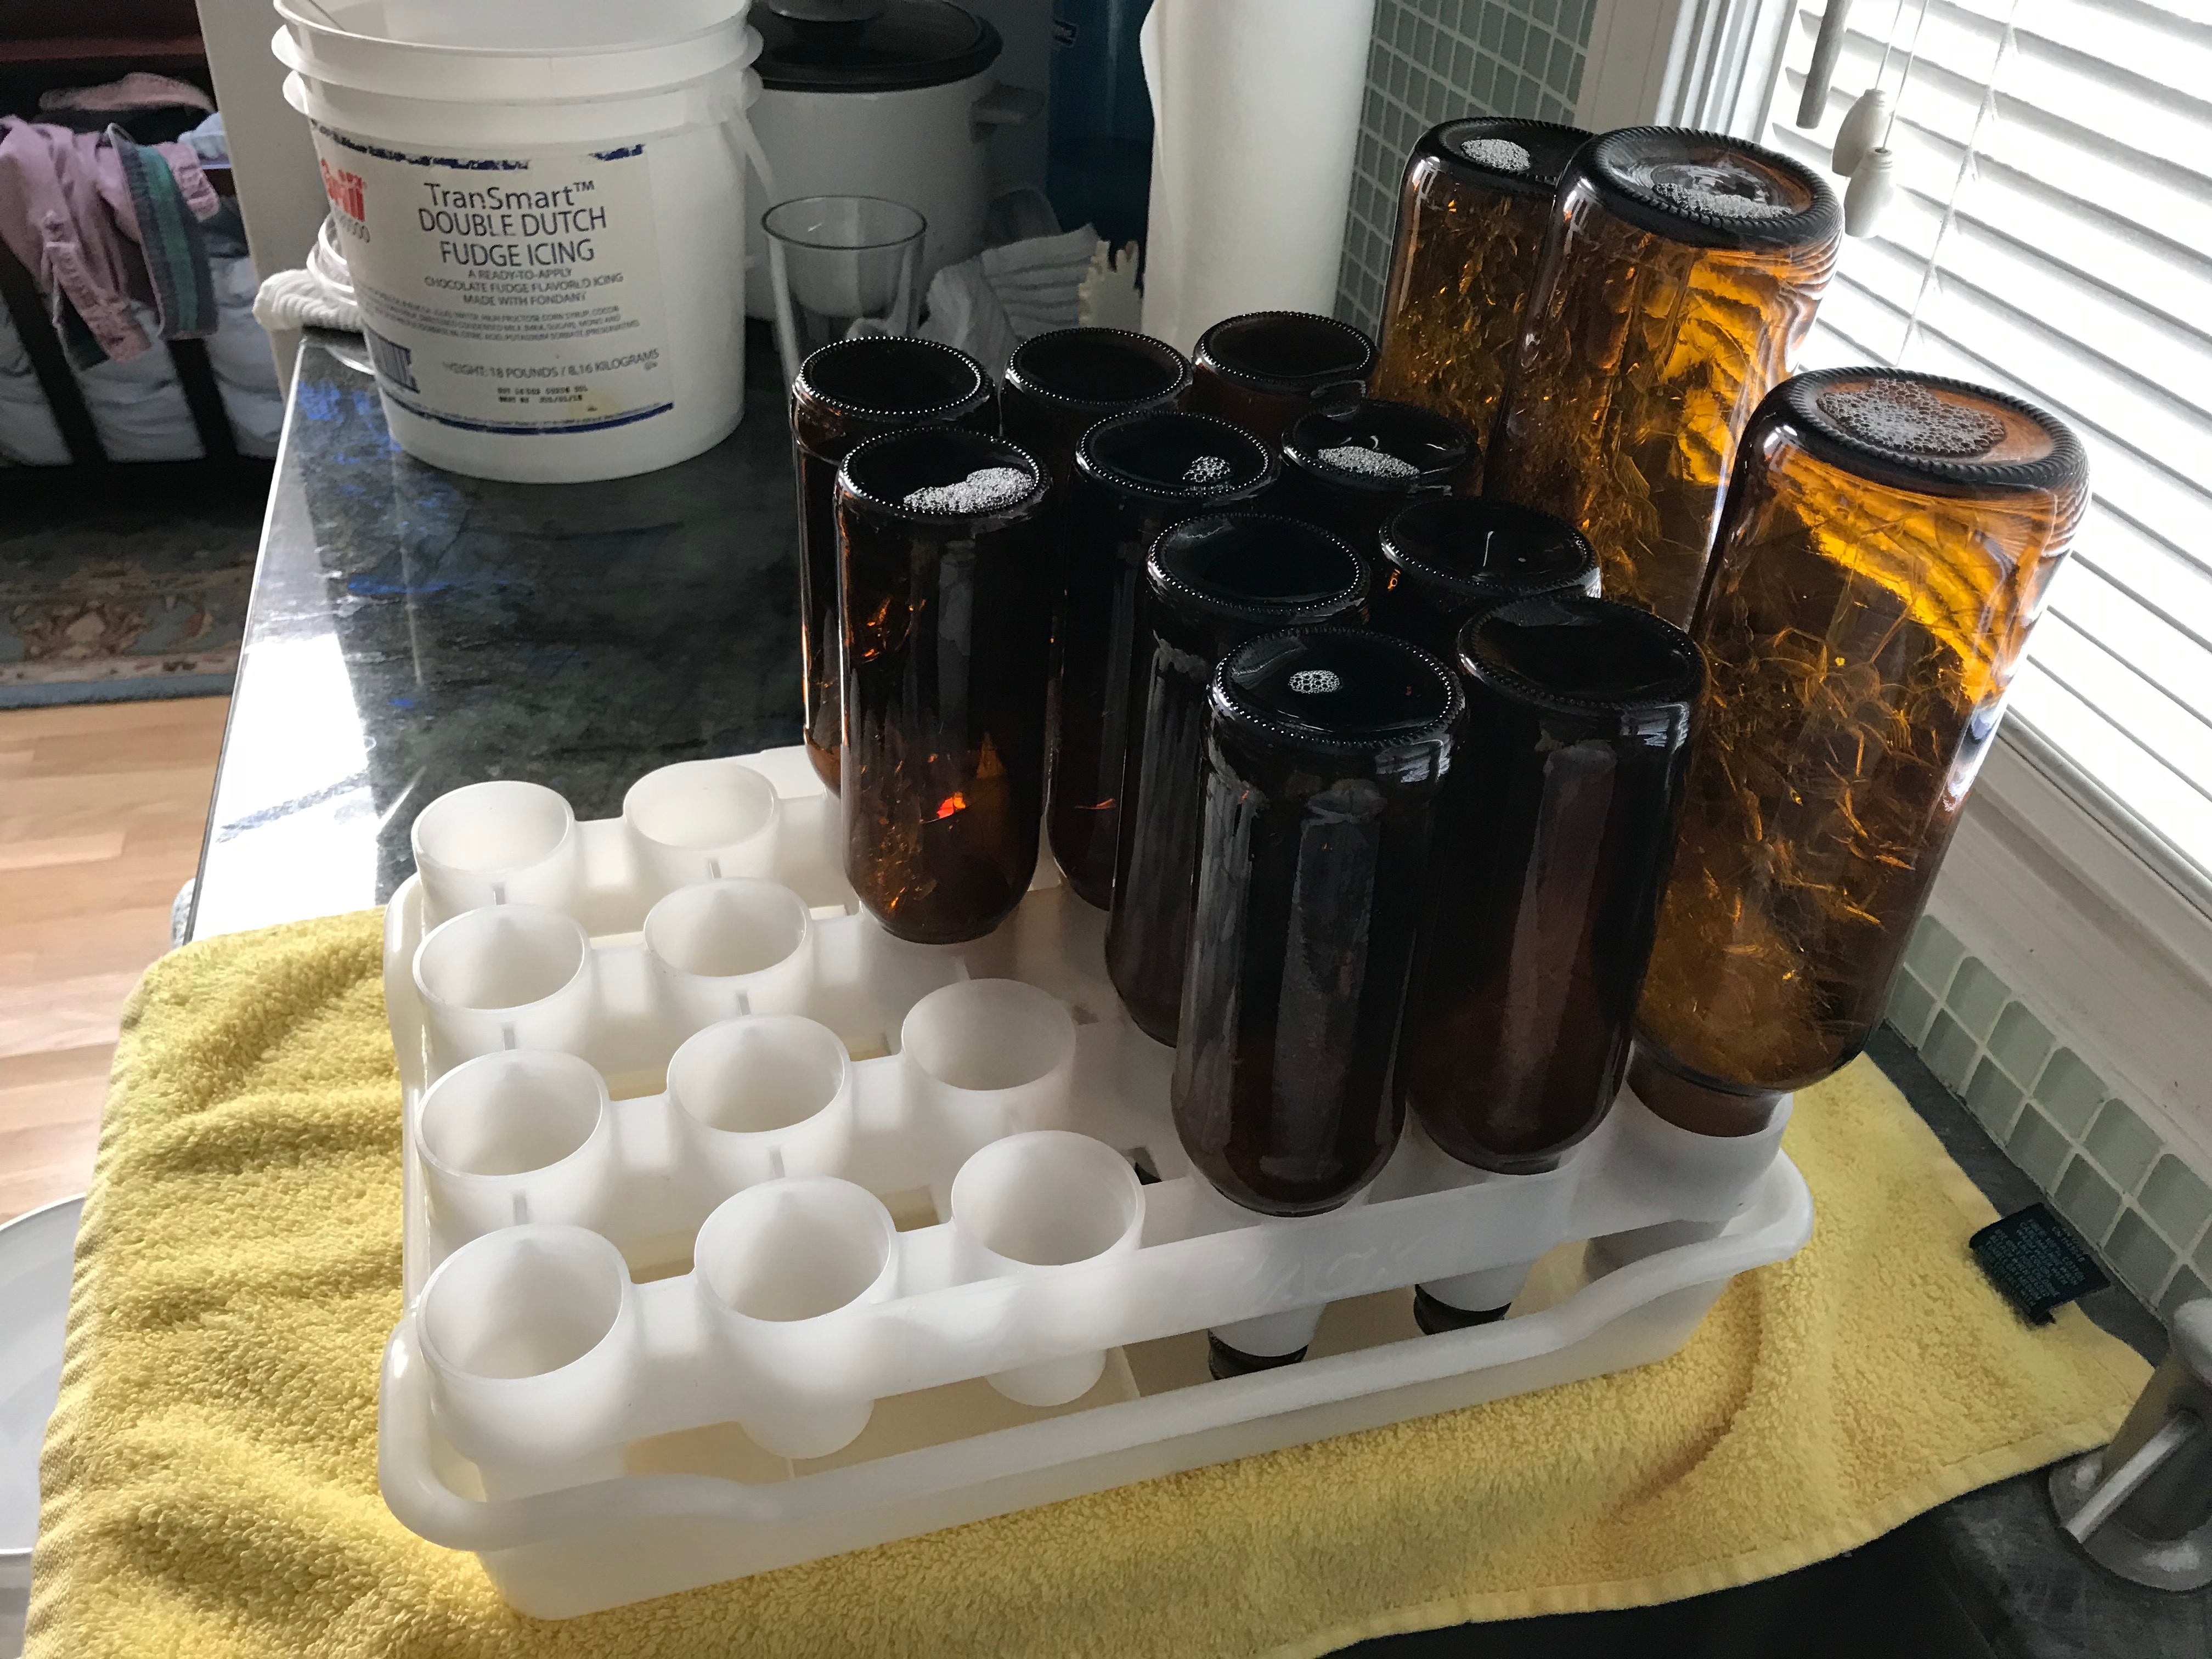
The first step is to assemble the bottles and caps, and sanitize them. I use a product called StarSan to sanitize, which is an acid that requires only brief contact to sanitize a surface; in fact, even the foam can be used for sanitizing. A solution of 1 oz of StarSan for 5 gallons of water is the right ratio, and suffices to provide enough solution to submerge bottles and equipment.
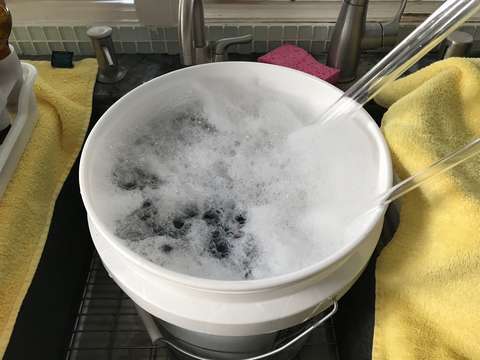
I soak the bottles for 10 minutes (even though 5 minutes, or even less, is sufficient), and for the small batches I do, I can usually do all my bottles with only two batches of bottle submerging. The bottles drain in a rack that is made for that purpose.

Some foam remains, but that is OK, as it is harmless to beer and body, and serves to keep the bottles sanitized between batches.
For the bottle caps, I cannot use the StarSan solution, as it is too acidic, and the acid would eat the plastic backing on the caps. So I use another sanitizer: vodka. They soak in vodka during the whole bottling process, and I fetch them out when complete. At the end, I discard the vodka. I know, what a waste, right?
Now a quick aside: I mentioned before about "natural carbonation", and it bears explaining what I mean by that. To explain that, I need to backup and explain a bit about the process of fermentation... Fermentation is the process wherein yeast that is suspended in a high-sugar medium (for example "wort", which is unfermented beer) consumes (eats) the sugars in the medium, and then produces two byproducts: carbon dioxide and alcohol. Without the yeast, there would be no alcohol, but the carbon dioxide produced (erm, "farted out") by the yeast during fermentation escapes the fermentation vessel by way of an airlock (which operates on the same - but reverse - principal as a bong, if you will) which allows gasses to leave the vessel, but not enter. During fermentation, we do not need the CO2, so we allow it to freely escape the fermentation vessel. However, once we're done with fermentation, if we want the resulting beverage to be carbonated - as we typically do for beer, champagne and sparkling wines/ciders/meads, but typically do not for other wines - then we need to capture some more CO2 and introduce it into the solution. This can either be forced into the beer using pressure and CO2 from tanks, or we can make use of the residual yeast that is still in suspension in the beer, and simply add some more sugar for those yeast to consume while in the bottle. If we do the latter, the amount of additional alcohol produced is minimal, but the CO2 has nowhere to go in the sealed bottle, so it dissolves into solution in the beer, thus "naturally" carbonating the beer. Make sense? Good.
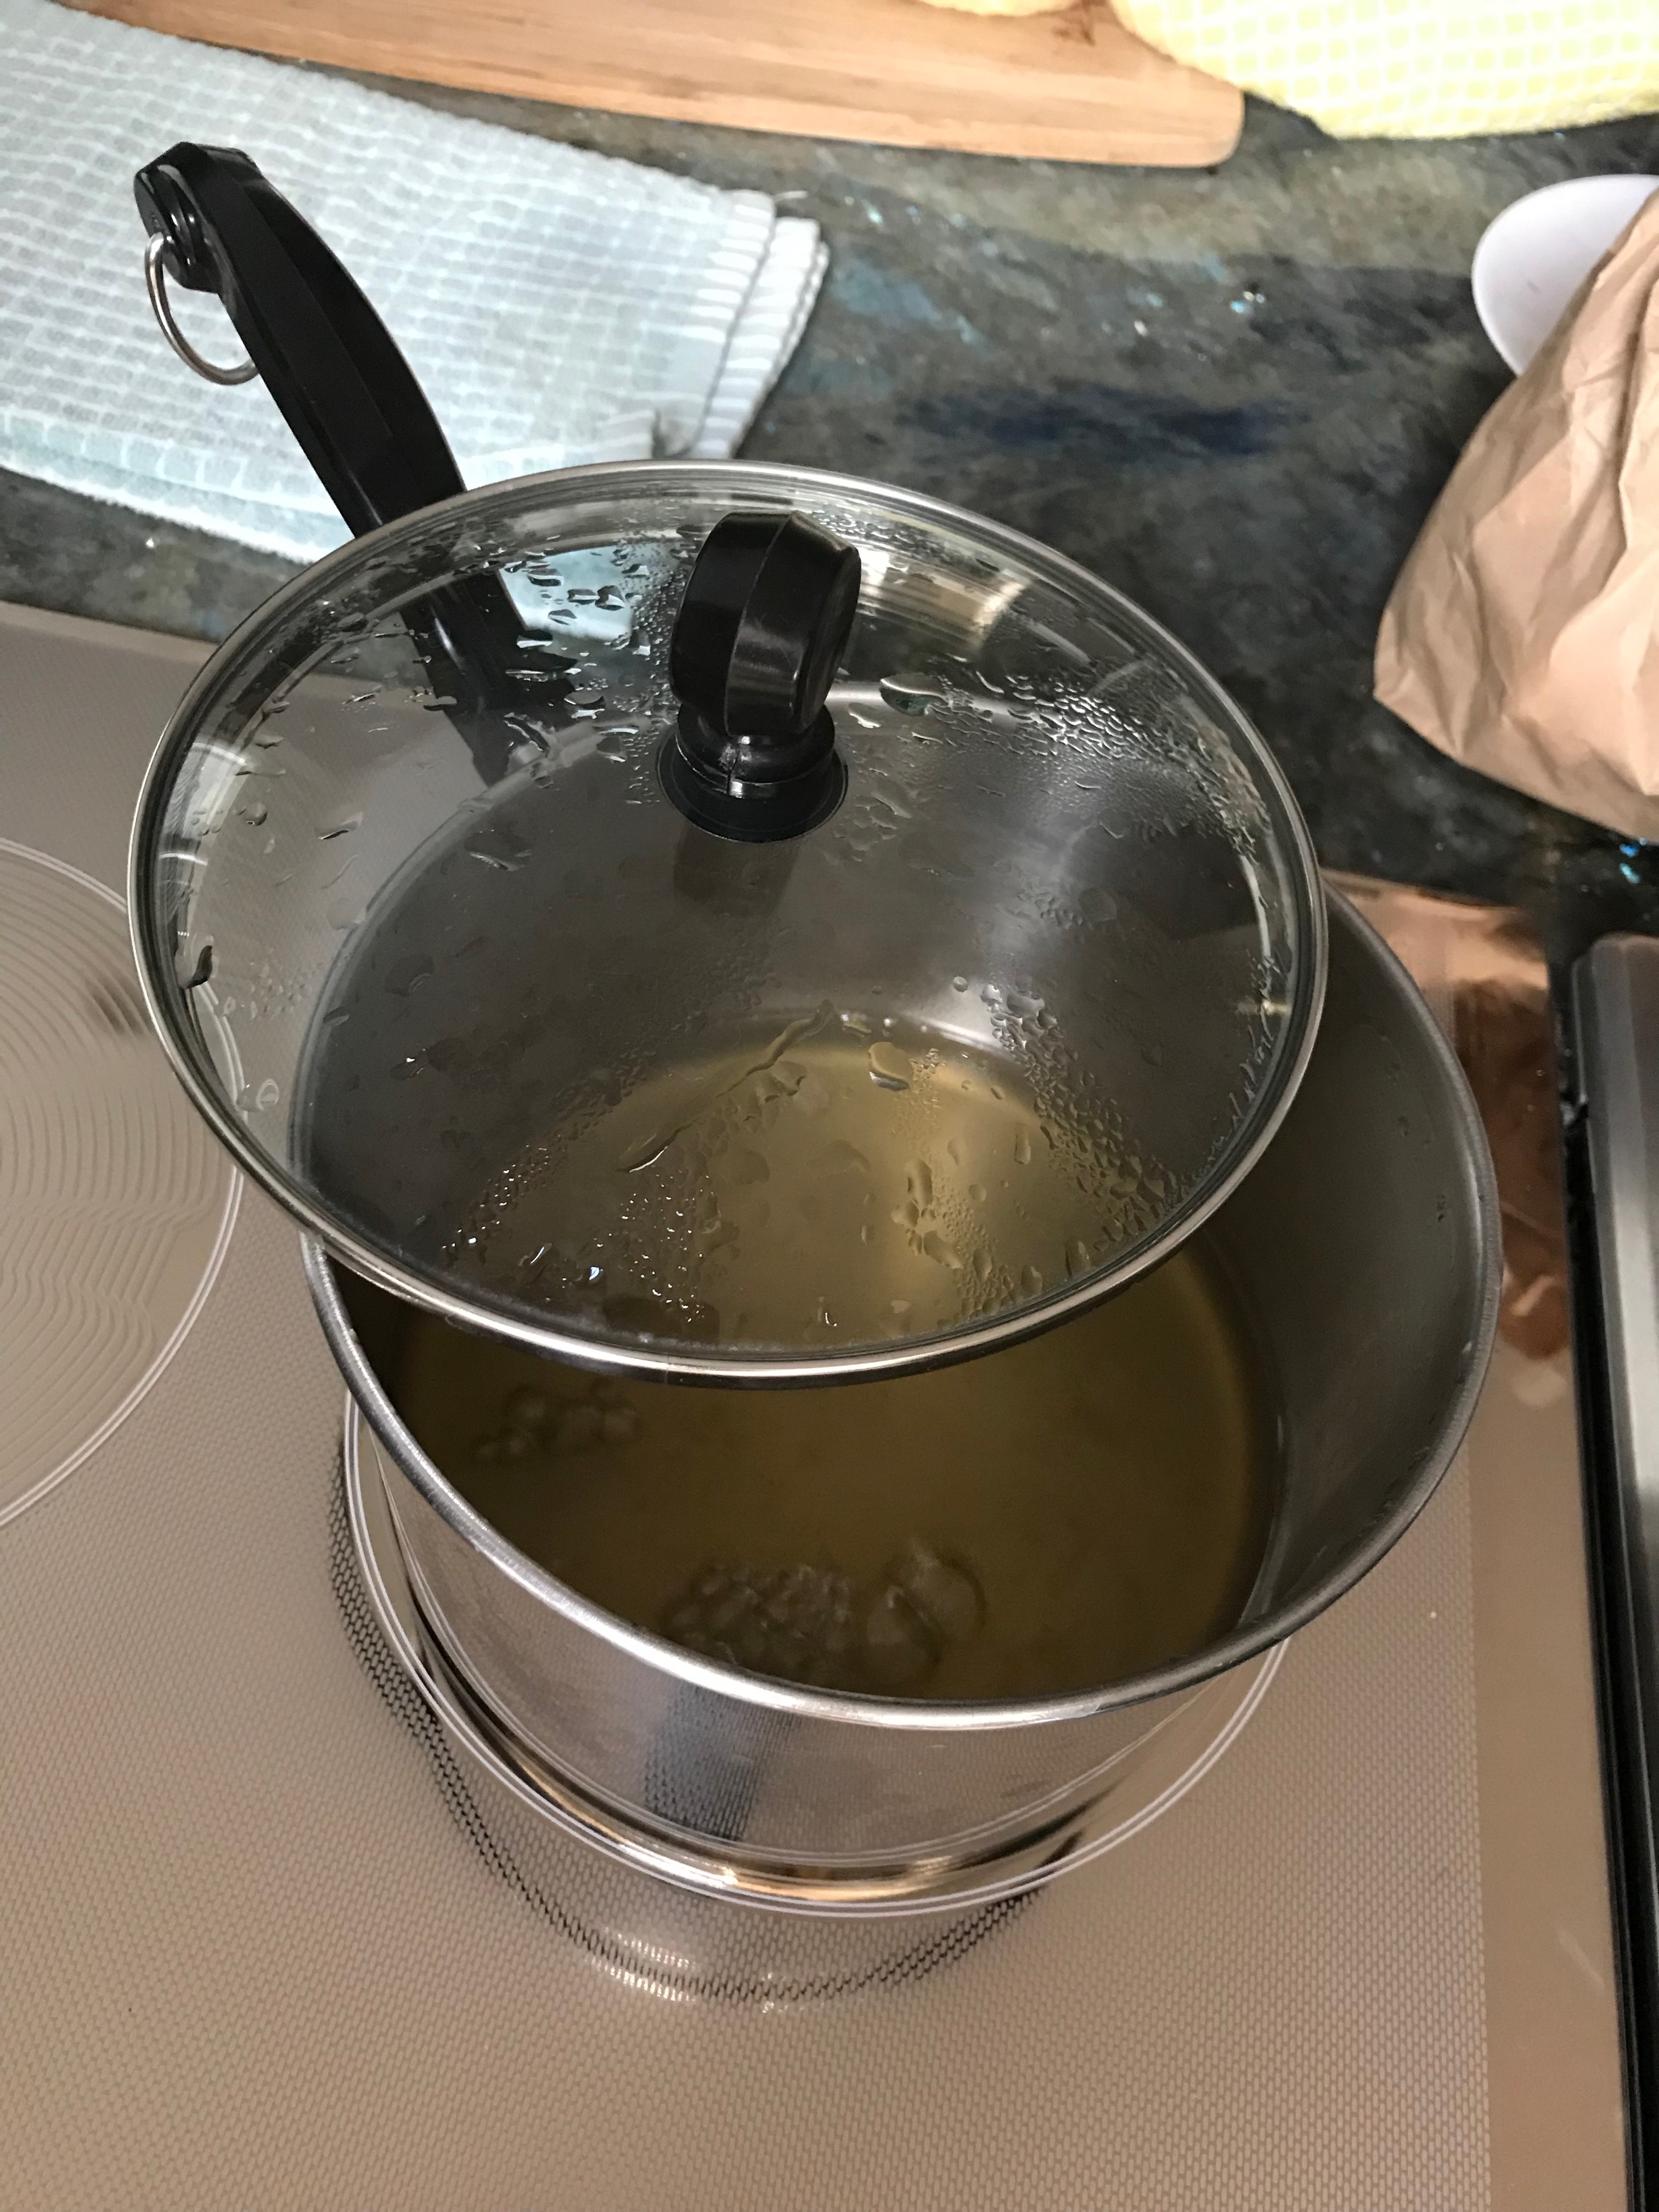
So, we need priming sugar to feed out yeast during bottle conditioning. While the bottle batches are soaking, I boil some water (usually half a cup) and add my priming sugar. I usually use Belgian candi syrup, but for this batch I used honey, 2.7 ounces to be exact. (I figured honey might be a good complimentary taste with the pumpkin and spice combinations.) After boiling the priming sugar for 20 minutes, I set it aside to cool.

I ferment in Corney kegs, which are kegs originally used for dispensing soda syrup at restaurants. (For those not in the know, the restaurant dispensers mix carbonated water supplied by the restaurant with syrup supplied by the soft drink manufacturers, which is much more economical for everyone involved, since transportation of water is prohibitively expensive, and restaurants make a large amount of their revenue off of drinks, soft drinks being almost entirely mark-up...) The dispenser pushes the syrup out of the keg by forcing carbon dioxide (which they already have in gas form in order to carbonate the water) into one post (the "in" post) of the keg, which pushes down on the surface of the syrup, forcing it to be drawn up in a long tube that reaches the bottom of the keg (known as the "dip tube"), which in turn is connected connected to the "out" post of the keg. CO2 in, syrup out; a pretty simple system.
The same process is used for the beer in the fermentation keg, and in order to bottle the fermented beer, I must first transfer it to a more manageable vessel; for me, this is a food-grade plastic bucket. The act of transferring liquids from one vessel to another is know in brewing parlance as "racking". So to rack the beer from the keg to the bucket, I attach a CO2 tank ("bottle", for my rest-of-world-residing readers...) to the "in" post of the fermenting keg, and a hose to the "out" post that feeds into the bucket. I then open the valve on the tank, and CO2 pushes down on the surface of the beer, which forces it to go into the only outlet available: the dip tube, and from thence it feeds into the "out" post, and through the hose and into the bucket. To introduce as little oxygen as possible into the beer (which can cause oxidation, i.e. spoilage), the end of the hose is positioned at the bottom of the bucket, to minimize splashing, and I cover the top of the bucket with a clean towel.
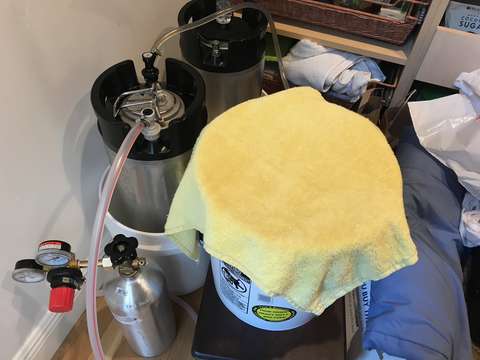
It's important to note here that the dip tube on fermenting kegs is cut slightly shorter, so that the tube does not reach the very bottom of the keg, like it does for normal dispensing scenarios. When dispensing liquids (syrup or beer) out of kegs, you want every last drop, but when racking fermented beer from a fermentation vessel, you want to leave behind the layer of dead yeast, hops and grain residue that collects on the bottom. This layer on the bottom is known as "trub" (which is pronounced to rhyme with "boob", heh...), and is similar to the "lees" in wine; if we bottled that along with the beer, it would taste nasty. So the dip tube doesn't reach all the way down to the bottom, and before racking beer out of a fermenter, the brewer is careful to avoid agitating the source vessel, otherwise the trub would be disturbed, and float up into suspension in the beer, and transfer along with it when racking. This is why you'll note that I do the transfer in our laundry room, where I ferment my beer (since it's warm and normally dark), i.e. rather than bringing the fermenter to the bucket, I bring the bucket to the fermenter.
While the racking is going on, I add my cooled priming sugar solution, so that it mixes with the beer as much as possible. Once racking is complete, I move the bottling bucket to where I'm bottling (my kitchen, typically), and place it on a counter, because I'll be using a gravity-driven siphon to do my bottling.
My drained bottles then go into buckets or bins, which are then placed on towels on the floor. The bottles need to be below the counter level for the siphon to maintain. I use the buckets or bins to catch any beer that overflows the bottles, or drips from the bottling wand when I move between bottles; it just makes cleanup easier, because rather than cleaning the floor, I just clean the buckets or bins.
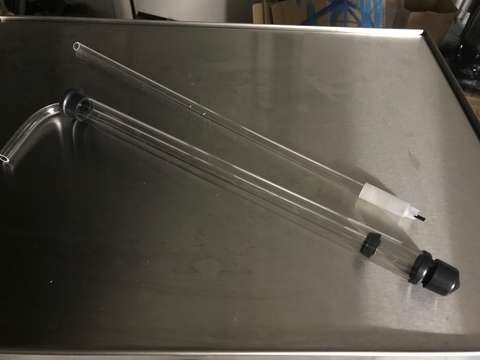
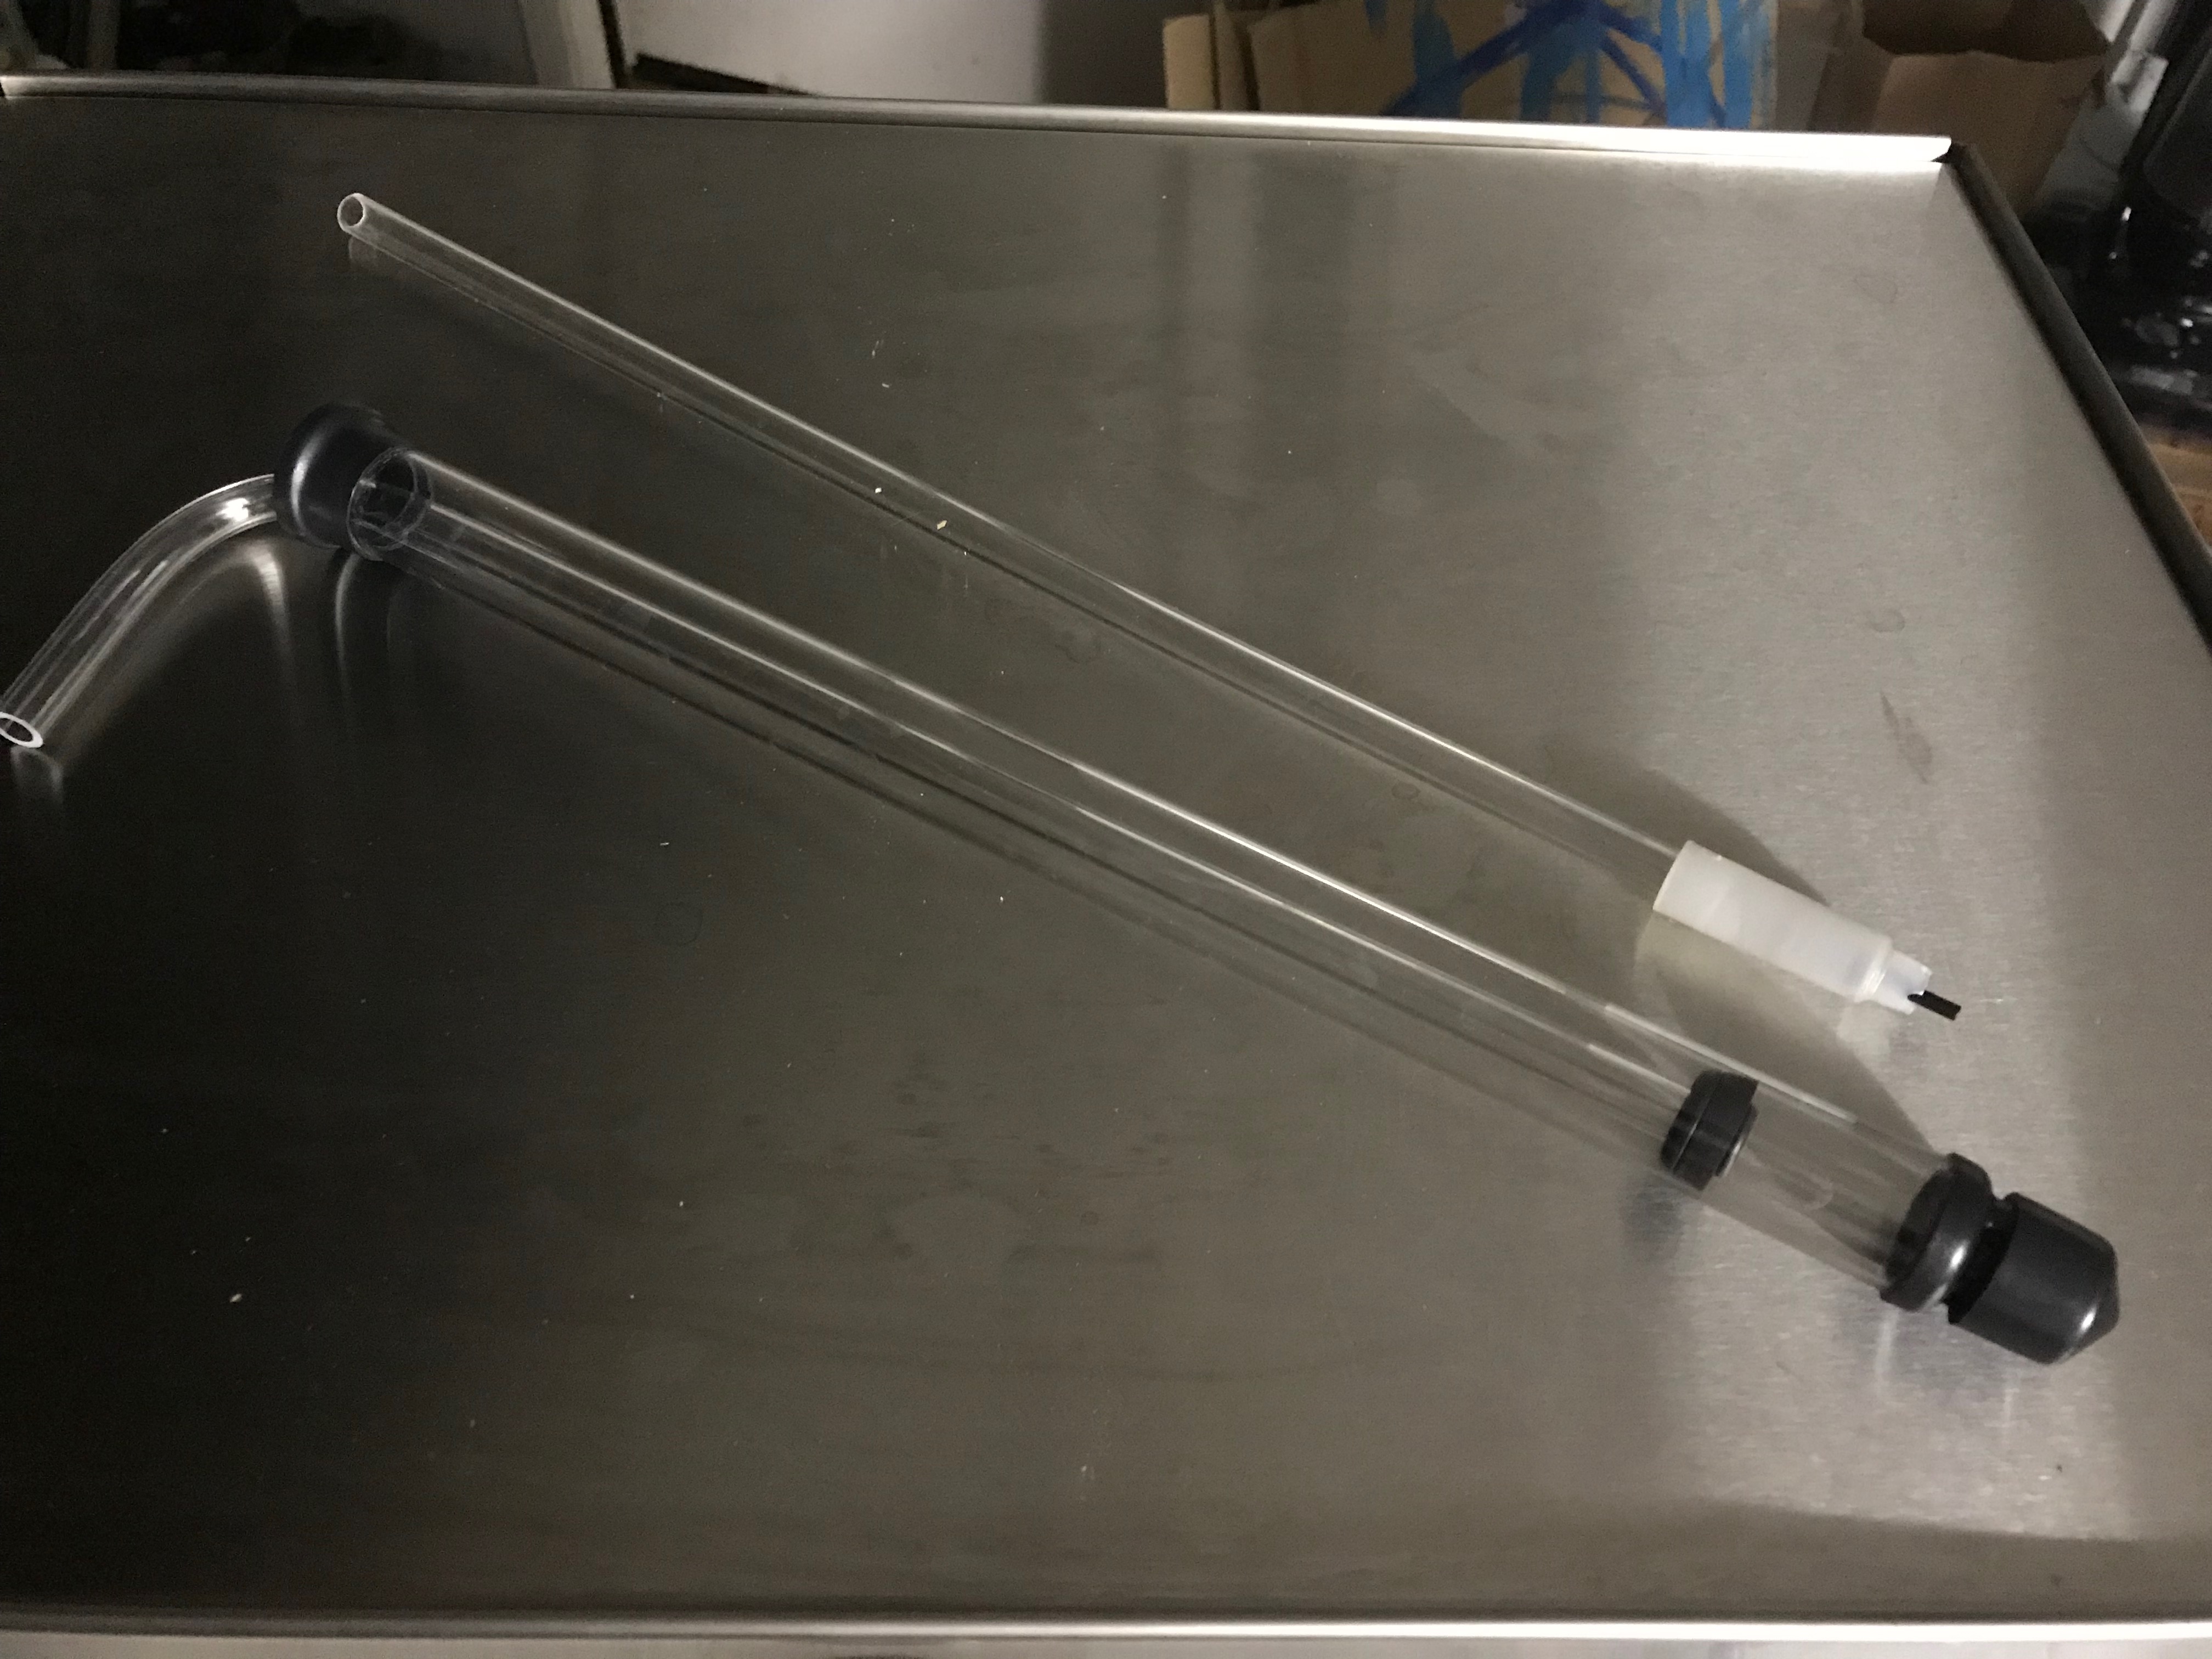
Once I'm all ready to begin bottling, I connect up the transfer apparatus that I use for getting the beer from the bucket to the bottles. I use an auto-siphon to make it very easy to start the siphon: this device has an outer tube that rests in the fluid (with a little cap to prevent it from sucking any remaining trub from the dregs of the bucket) that has a simple one-way valve in the bottom, and then an inner tube (called a "racking cane") that can move up and down is used to pump fluid up the tube, by resistance from the one-way valve. At the top of the racking cane, we connect a hose that trails down to the bottling area, and at the end of that hose we attach a "bottling wand", which is simply a tube with a spring-loaded valve at the end of it, which opens when we press it down (onto the bottom of a bottle), and closes when we let up. This apparatus makes it relatively easy - once the siphon has been primed - to dispense beer into a bottle (by pressing the wand down against the bottom of the bottle), and yet avoids spillage when moving the wand from bottle to bottle. The auto-siphon and bottling wand are pictured below.
Before starting the actual bottling, I use the auto-siphon to gently stir the beer in the bucket, helping to ensure a more even distribution of the priming sugar solution into the beer. If I forget to do this (as I have done on occasion), then the sugar solution, being heavier than the beer, will tend to settle to the bottom of the bucket, and since the siphon pulls from the bottom of the bucket, the first few bottles of beer would have a lot of priming sugar, whilst the last bottles would have very little. This results in inconsistent carbonation.
Starting the siphon is a lot easier with two people, as one person pumps the auto-siphon, whilst the bottling wand is held "open" by pressing it into a bottle or glass. However, on this particular day, unlike the usual routine, I had no help, so I held a pint glass in one hand with the bottling wand pressing down against the bottom, and also used that hand to steady the auto-siphon, while I used the other hand to pump the auto-siphon to prime it. It was tricky, but this was not my first time doing this, and I managed it with relative ease.
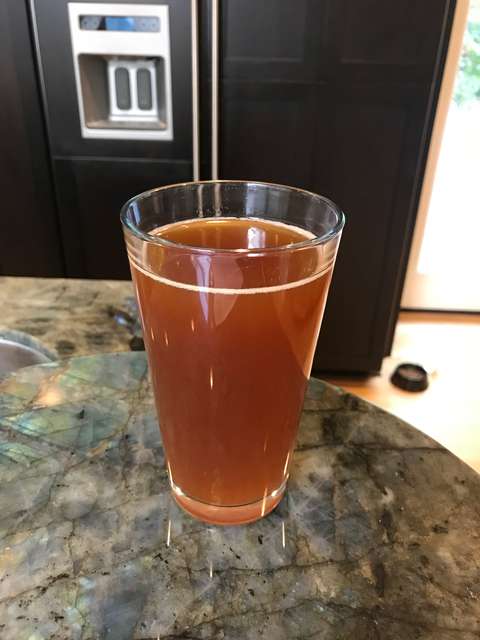
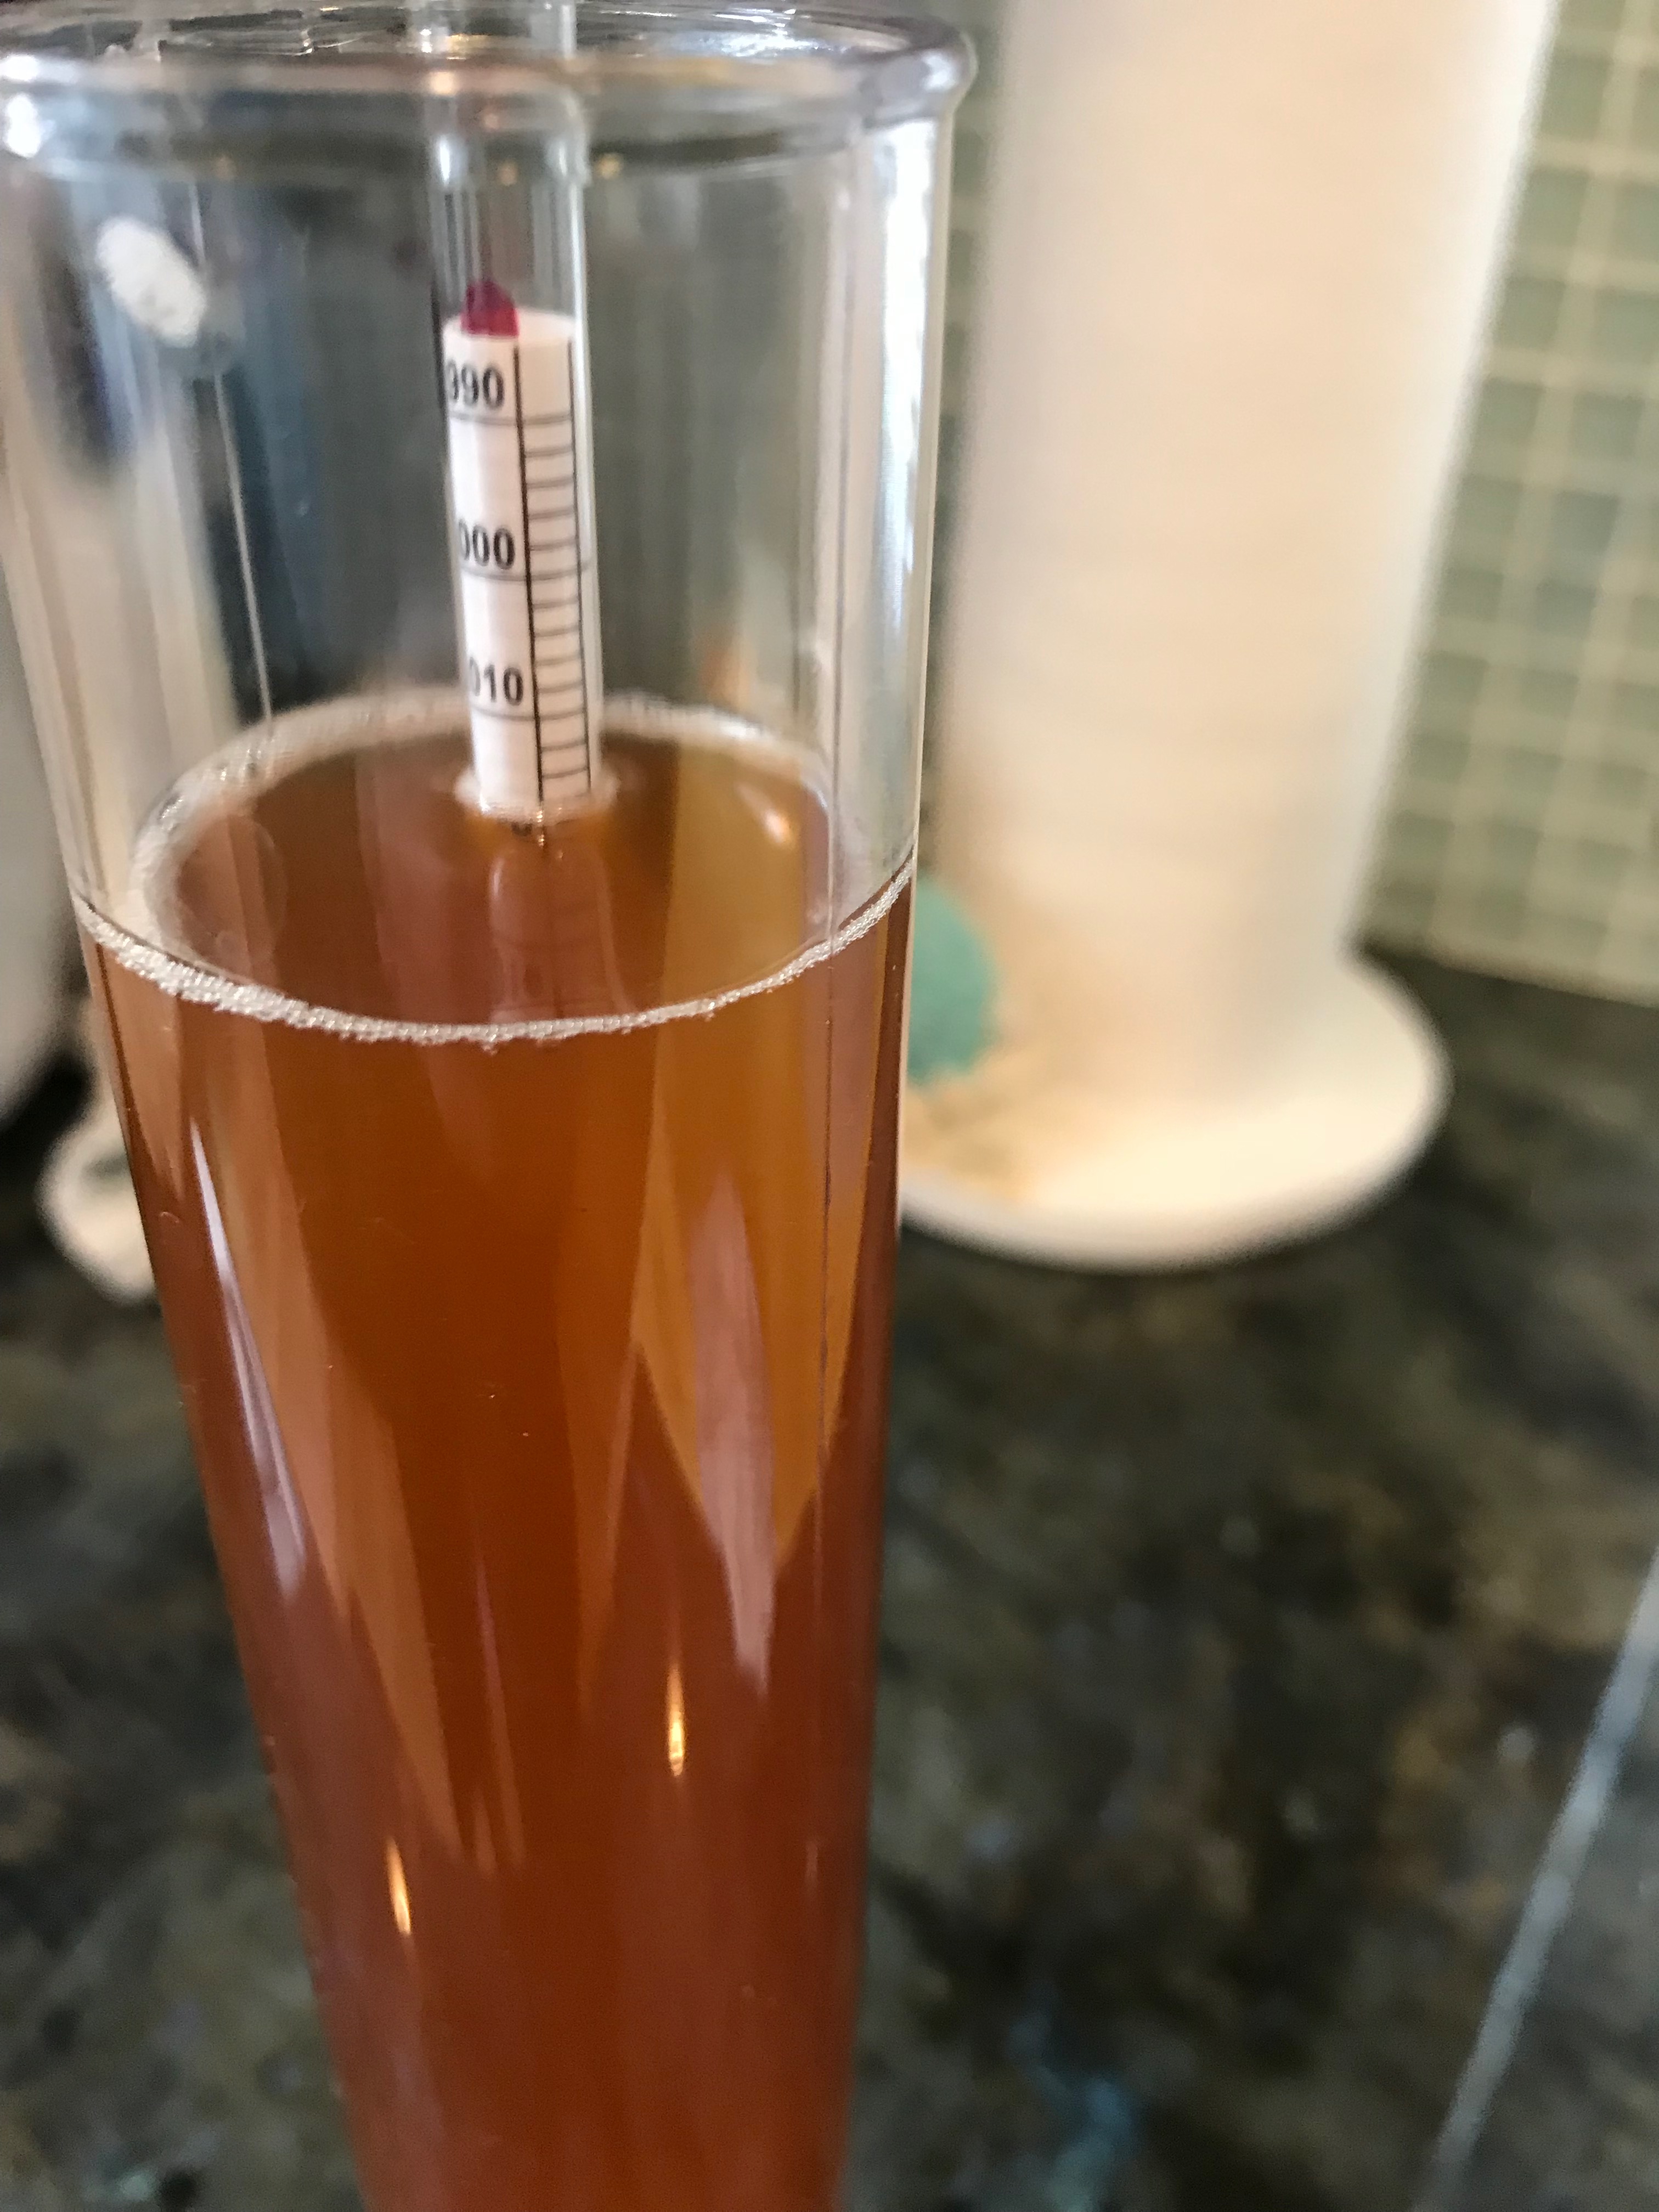
Since the start of the siphon is usually relatively violent compared to the normal flow once the siphon is established, I like to capture the first little bit of the beer into a pint glass and/or a hydrometer flask. This I put aside, as it serves two purposes: I can measure the specific gravity (thickness, essentially, which equates to how much sugar remains) of the beer, and I can also subsequently measure the flavours (erm, that would be tasting it)... In this instance, the specific gravity of the beer measured in at 1.018 units of specific gravity (water is 1.0, so higher that 1.0 is heavier than water):

and the flavour measured in at "not bad" units of yummage...
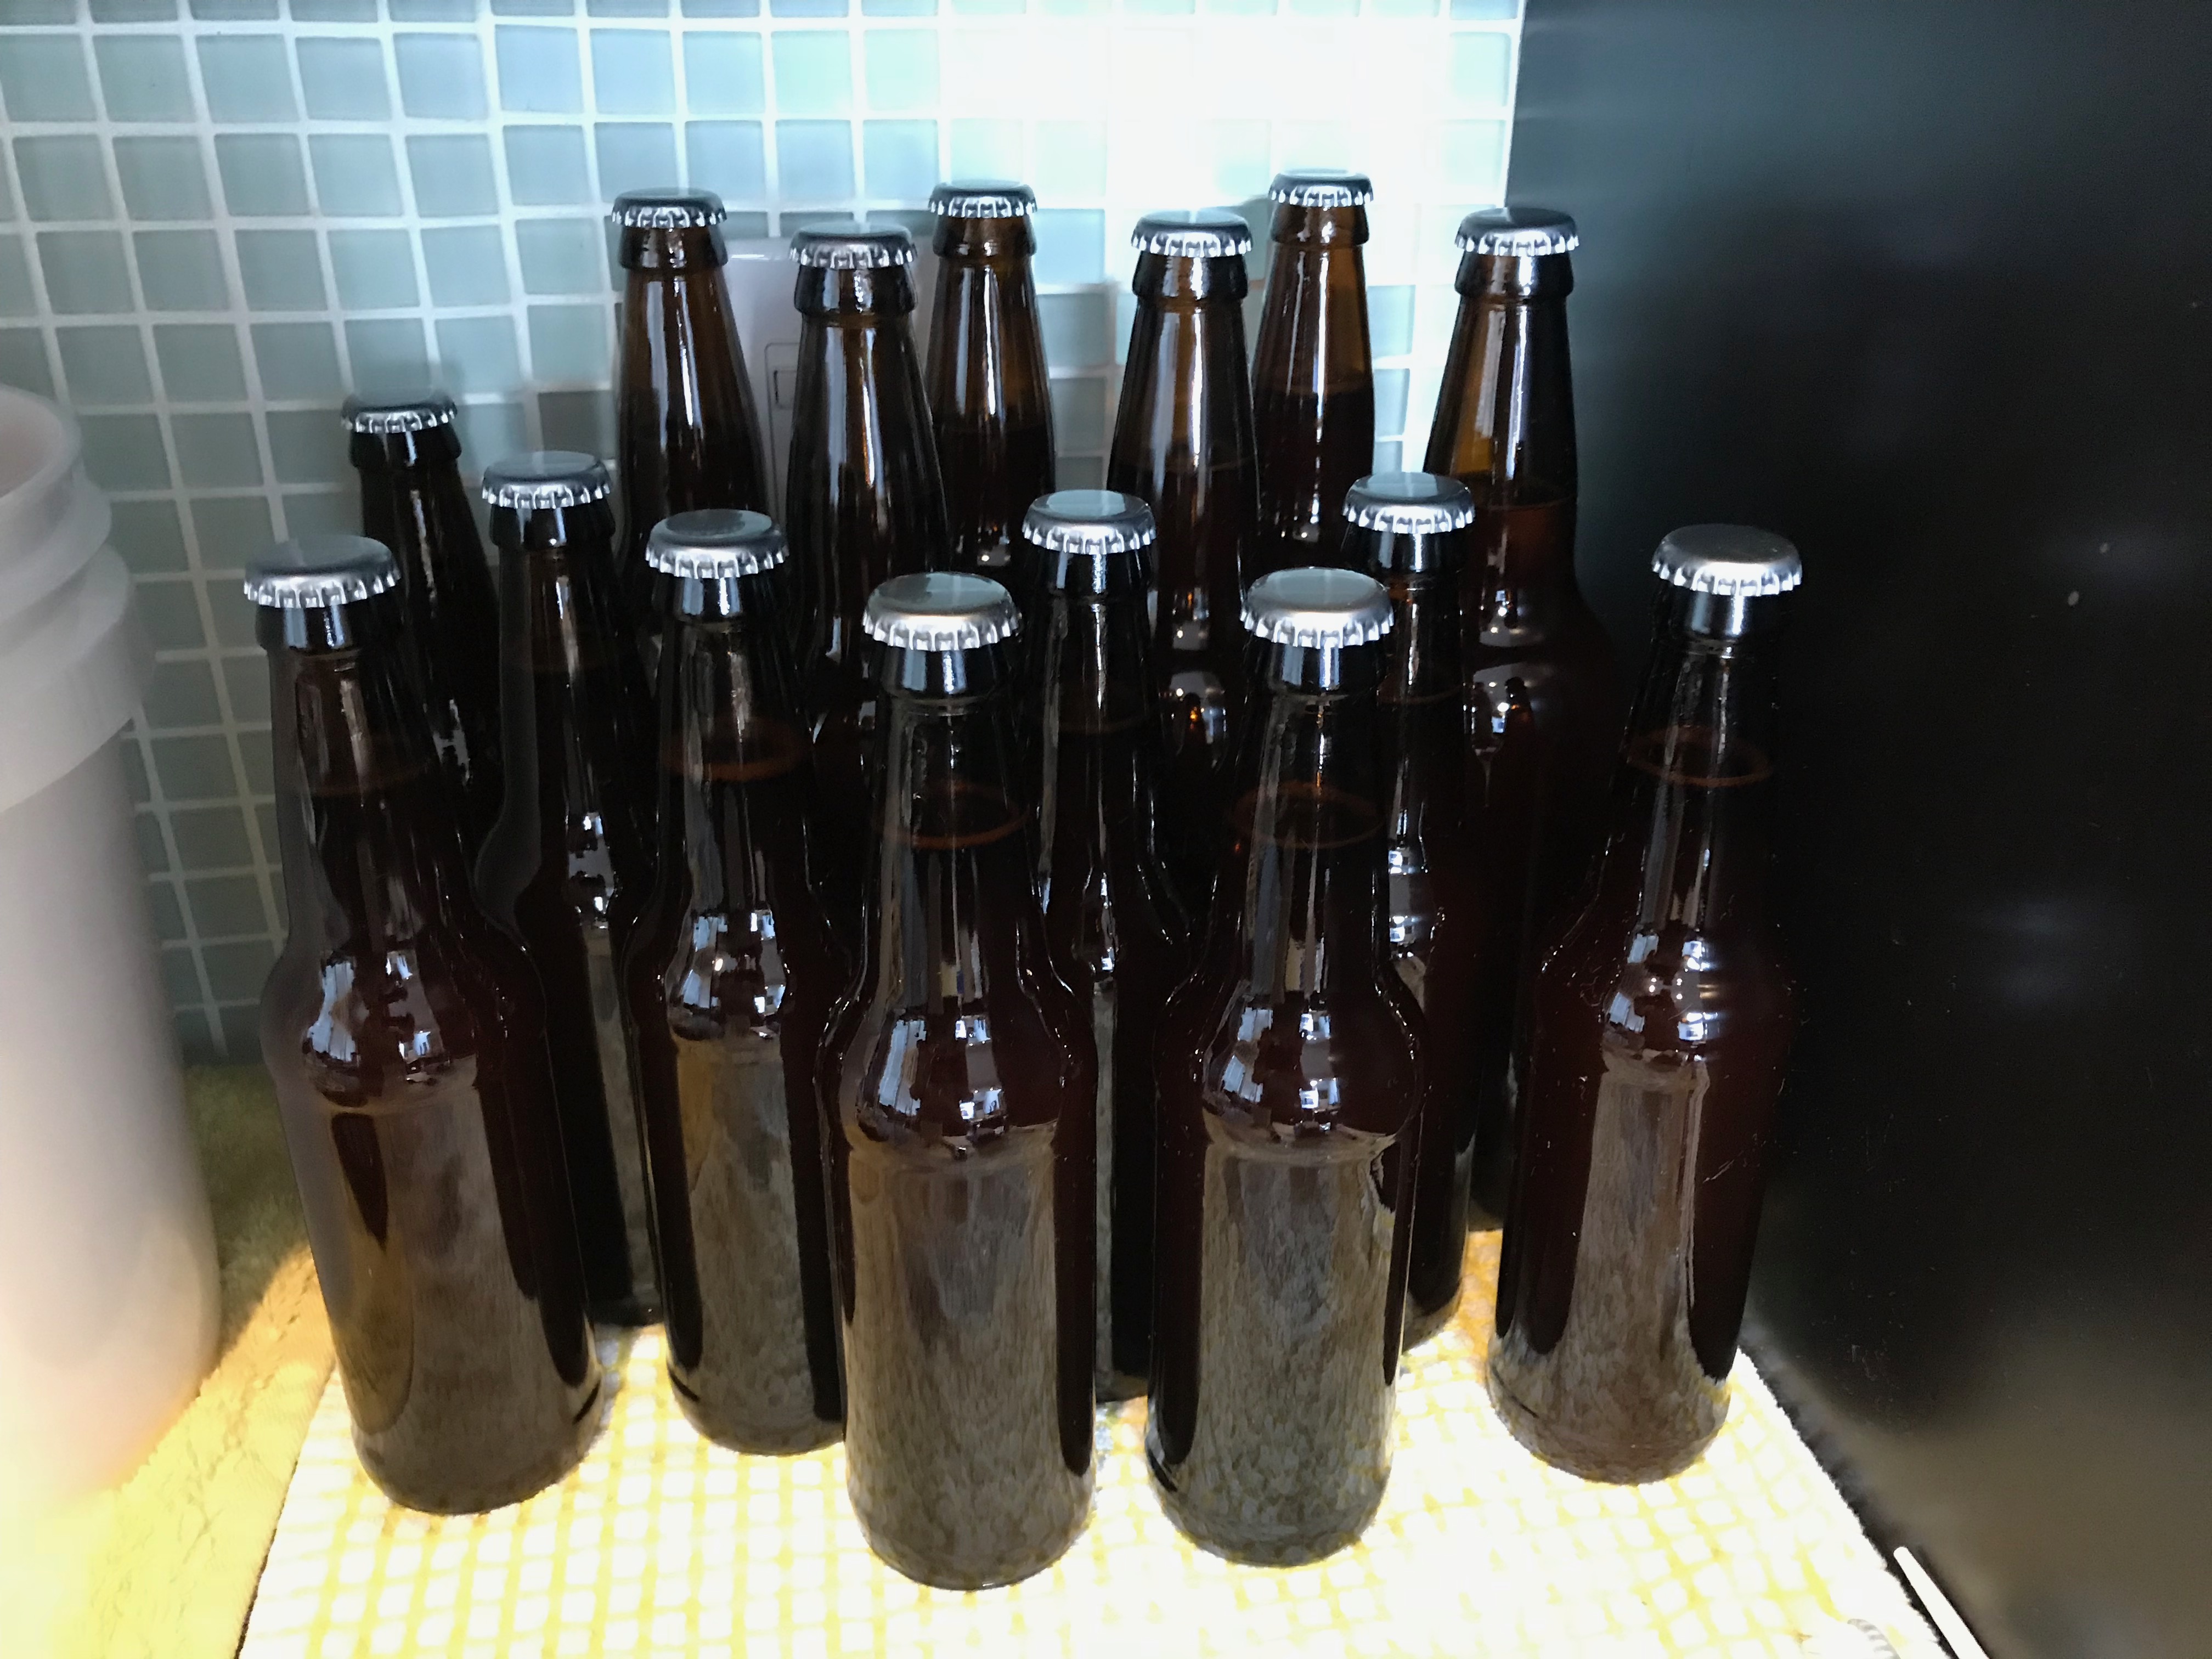
Once the siphon has begun, it's simply a matter of dispensing the beer into all of the bottles (or as many as we can, given how much finished beer we have). Depending on the beer, I use a mix of large (22-ounce) and small (12-ounce, single serving) bottles. The large make great gifts, and are good for tastings, whereas the small are great for individual full-glass servings.
In the end, for this small batch, I ended up with six 22-ounce bottles, and nine 12-ounce bottles, making this a "limited reserve" pumpkin ale...

Oh, and I had about 10 ounces left for tasting the "young" beer. It still should condition in bottles for a while, both to carbonate and to age (let the flavours mellow and combine), but even in this green state, it's not bad. Actually, I think I overdid the pumpkin spices for my taste, but it has all the right elements of a pumpkin ale, just perhaps in slight excess... It may improve with age, beers often do...
After dispensing to all of the bottles, it is then necessary to cap the bottles. I use normal crown caps: homebrewers cannot use twist-off, as the pressure of natural carbonation is too great. This requires a bottle-capper, and I use a butterfly capper like this:
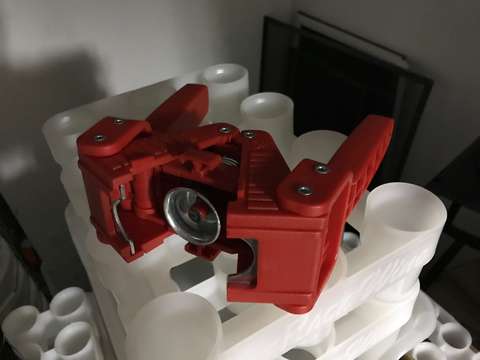
Capping is a lot of fun, and since it rounds out the bottling session, it's nice to have as one of the last tasks involved. For the butterfly capper, you simply place the cap on the bottle, open the capping jaws by moving the butterfly "wings" into their highest position, place the jaws on the cap, and then firmly "flap" the wings down, thus compressing the jaws, which clamps the cap into place on the top of the bottle.
Unfortunately, that's not the last task involved in bottling day, and the rest is all about cleanup... I dump the trub into a small bucket, usually along with one of my Tilt Hydrometers and perhaps a dry-hopping sock as well. To avoid yeasty buildup in our pipes, I add very hot water to the trub bucket, and continue to dilute it massively with hot water as I dump it down the drain. Then the hard part: cleaning the keg. The keg then needs to be partially disassembled (posts removed, and dip tube removed), and everything scrubbed down from the "krausen" (a mixture of hops and "beer stone" and other debris that collects during fermentation), and subjected to a strong cleaning agent (PBW, "powdered brewers wash"), and a rinse with clean water.
Then the buckets must be cleaned, and the bottling apparatus and priming sugar pot, and then everything put away. Finally, I can relax with my young beer, or better yet a previously bottled, and properly conditioned beer...
Hope this was interesting, or at least enjoyable...
#Pumpkin #ActOfGourd #Bottling #HowTo
 I soak the bottles for 10 minutes (even though 5 minutes, or even less, is sufficient), and for the small batches I do, I can usually do all my bottles with only two batches of bottle submerging. The bottles drain in a rack that is made for that purpose.
 Some foam remains, but that is OK, as it is harmless to beer and body, and serves to keep the bottles sanitized between batches.
For the bottle caps, I cannot use the StarSan solution, as it is too acidic, and the acid would eat the plastic backing on the caps. So I use another sanitizer: vodka. They soak in vodka during the whole bottling process, and I fetch them out when complete. At the end, I discard the vodka. I know, what a waste, right?
Now a quick aside: I mentioned before about "natural carbonation", and it bears explaining what I mean by that. To explain that, I need to backup and explain a bit about the process of fermentation... Fermentation is the process wherein yeast that is suspended in a high-sugar medium (for example "wort", which is unfermented beer) consumes (eats) the sugars in the medium, and then produces two byproducts: carbon dioxide and alcohol. Without the yeast, there would be no alcohol, but the carbon dioxide produced (erm, "farted out") by the yeast during fermentation escapes the fermentation vessel by way of an airlock (which operates on the same - but reverse - principal as a bong, if you will) which allows gasses to leave the vessel, but not enter. During fermentation, we do not need the CO2, so we allow it to freely escape the fermentation vessel. However, once we're done with fermentation, if we want the resulting beverage to be carbonated - as we typically do for beer, champagne and sparkling wines/ciders/meads, but typically do not for other wines - then we need to capture some more CO2 and introduce it into the solution. This can either be forced into the beer using pressure and CO2 from tanks, or we can make use of the residual yeast that is still in suspension in the beer, and simply add some more sugar for those yeast to consume while in the bottle. If we do the latter, the amount of additional alcohol produced is minimal, but the CO2 has nowhere to go in the sealed bottle, so it dissolves into solution in the beer, thus "naturally" carbonating the beer. Make sense? Good.
So, we need priming sugar to feed out yeast during bottle conditioning. While the bottle batches are soaking, I boil some water (usually half a cup) and add my priming sugar. I usually use Belgian candi syrup, but for this batch I used honey, 2.7 ounces to be exact. (I figured honey might be a good complimentary taste with the pumpkin and spice combinations.) After boiling the priming sugar for 20 minutes, I set it aside to cool.
Some foam remains, but that is OK, as it is harmless to beer and body, and serves to keep the bottles sanitized between batches.
For the bottle caps, I cannot use the StarSan solution, as it is too acidic, and the acid would eat the plastic backing on the caps. So I use another sanitizer: vodka. They soak in vodka during the whole bottling process, and I fetch them out when complete. At the end, I discard the vodka. I know, what a waste, right?
Now a quick aside: I mentioned before about "natural carbonation", and it bears explaining what I mean by that. To explain that, I need to backup and explain a bit about the process of fermentation... Fermentation is the process wherein yeast that is suspended in a high-sugar medium (for example "wort", which is unfermented beer) consumes (eats) the sugars in the medium, and then produces two byproducts: carbon dioxide and alcohol. Without the yeast, there would be no alcohol, but the carbon dioxide produced (erm, "farted out") by the yeast during fermentation escapes the fermentation vessel by way of an airlock (which operates on the same - but reverse - principal as a bong, if you will) which allows gasses to leave the vessel, but not enter. During fermentation, we do not need the CO2, so we allow it to freely escape the fermentation vessel. However, once we're done with fermentation, if we want the resulting beverage to be carbonated - as we typically do for beer, champagne and sparkling wines/ciders/meads, but typically do not for other wines - then we need to capture some more CO2 and introduce it into the solution. This can either be forced into the beer using pressure and CO2 from tanks, or we can make use of the residual yeast that is still in suspension in the beer, and simply add some more sugar for those yeast to consume while in the bottle. If we do the latter, the amount of additional alcohol produced is minimal, but the CO2 has nowhere to go in the sealed bottle, so it dissolves into solution in the beer, thus "naturally" carbonating the beer. Make sense? Good.
So, we need priming sugar to feed out yeast during bottle conditioning. While the bottle batches are soaking, I boil some water (usually half a cup) and add my priming sugar. I usually use Belgian candi syrup, but for this batch I used honey, 2.7 ounces to be exact. (I figured honey might be a good complimentary taste with the pumpkin and spice combinations.) After boiling the priming sugar for 20 minutes, I set it aside to cool.
 I ferment in Corney kegs, which are kegs originally used for dispensing soda syrup at restaurants. (For those not in the know, the restaurant dispensers mix carbonated water supplied by the restaurant with syrup supplied by the soft drink manufacturers, which is much more economical for everyone involved, since transportation of water is prohibitively expensive, and restaurants make a large amount of their revenue off of drinks, soft drinks being almost entirely mark-up...) The dispenser pushes the syrup out of the keg by forcing carbon dioxide (which they already have in gas form in order to carbonate the water) into one post (the "in" post) of the keg, which pushes down on the surface of the syrup, forcing it to be drawn up in a long tube that reaches the bottom of the keg (known as the "dip tube"), which in turn is connected connected to the "out" post of the keg. CO2 in, syrup out; a pretty simple system.
The same process is used for the beer in the fermentation keg, and in order to bottle the fermented beer, I must first transfer it to a more manageable vessel; for me, this is a food-grade plastic bucket. The act of transferring liquids from one vessel to another is know in brewing parlance as "racking". So to rack the beer from the keg to the bucket, I attach a CO2 tank ("bottle", for my rest-of-world-residing readers...) to the "in" post of the fermenting keg, and a hose to the "out" post that feeds into the bucket. I then open the valve on the tank, and CO2 pushes down on the surface of the beer, which forces it to go into the only outlet available: the dip tube, and from thence it feeds into the "out" post, and through the hose and into the bucket. To introduce as little oxygen as possible into the beer (which can cause oxidation, i.e. spoilage), the end of the hose is positioned at the bottom of the bucket, to minimize splashing, and I cover the top of the bucket with a clean towel.
I ferment in Corney kegs, which are kegs originally used for dispensing soda syrup at restaurants. (For those not in the know, the restaurant dispensers mix carbonated water supplied by the restaurant with syrup supplied by the soft drink manufacturers, which is much more economical for everyone involved, since transportation of water is prohibitively expensive, and restaurants make a large amount of their revenue off of drinks, soft drinks being almost entirely mark-up...) The dispenser pushes the syrup out of the keg by forcing carbon dioxide (which they already have in gas form in order to carbonate the water) into one post (the "in" post) of the keg, which pushes down on the surface of the syrup, forcing it to be drawn up in a long tube that reaches the bottom of the keg (known as the "dip tube"), which in turn is connected connected to the "out" post of the keg. CO2 in, syrup out; a pretty simple system.
The same process is used for the beer in the fermentation keg, and in order to bottle the fermented beer, I must first transfer it to a more manageable vessel; for me, this is a food-grade plastic bucket. The act of transferring liquids from one vessel to another is know in brewing parlance as "racking". So to rack the beer from the keg to the bucket, I attach a CO2 tank ("bottle", for my rest-of-world-residing readers...) to the "in" post of the fermenting keg, and a hose to the "out" post that feeds into the bucket. I then open the valve on the tank, and CO2 pushes down on the surface of the beer, which forces it to go into the only outlet available: the dip tube, and from thence it feeds into the "out" post, and through the hose and into the bucket. To introduce as little oxygen as possible into the beer (which can cause oxidation, i.e. spoilage), the end of the hose is positioned at the bottom of the bucket, to minimize splashing, and I cover the top of the bucket with a clean towel.
 It's important to note here that the dip tube on fermenting kegs is cut slightly shorter, so that the tube does not reach the very bottom of the keg, like it does for normal dispensing scenarios. When dispensing liquids (syrup or beer) out of kegs, you want every last drop, but when racking fermented beer from a fermentation vessel, you want to leave behind the layer of dead yeast, hops and grain residue that collects on the bottom. This layer on the bottom is known as "trub" (which is pronounced to rhyme with "boob", heh...), and is similar to the "lees" in wine; if we bottled that along with the beer, it would taste nasty. So the dip tube doesn't reach all the way down to the bottom, and before racking beer out of a fermenter, the brewer is careful to avoid agitating the source vessel, otherwise the trub would be disturbed, and float up into suspension in the beer, and transfer along with it when racking. This is why you'll note that I do the transfer in our laundry room, where I ferment my beer (since it's warm and normally dark), i.e. rather than bringing the fermenter to the bucket, I bring the bucket to the fermenter.
While the racking is going on, I add my cooled priming sugar solution, so that it mixes with the beer as much as possible. Once racking is complete, I move the bottling bucket to where I'm bottling (my kitchen, typically), and place it on a counter, because I'll be using a gravity-driven siphon to do my bottling.
My drained bottles then go into buckets or bins, which are then placed on towels on the floor. The bottles need to be below the counter level for the siphon to maintain. I use the buckets or bins to catch any beer that overflows the bottles, or drips from the bottling wand when I move between bottles; it just makes cleanup easier, because rather than cleaning the floor, I just clean the buckets or bins.
Once I'm all ready to begin bottling, I connect up the transfer apparatus that I use for getting the beer from the bucket to the bottles. I use an auto-siphon to make it very easy to start the siphon: this device has an outer tube that rests in the fluid (with a little cap to prevent it from sucking any remaining trub from the dregs of the bucket) that has a simple one-way valve in the bottom, and then an inner tube (called a "racking cane") that can move up and down is used to pump fluid up the tube, by resistance from the one-way valve. At the top of the racking cane, we connect a hose that trails down to the bottling area, and at the end of that hose we attach a "bottling wand", which is simply a tube with a spring-loaded valve at the end of it, which opens when we press it down (onto the bottom of a bottle), and closes when we let up. This apparatus makes it relatively easy - once the siphon has been primed - to dispense beer into a bottle (by pressing the wand down against the bottom of the bottle), and yet avoids spillage when moving the wand from bottle to bottle. The auto-siphon and bottling wand are pictured below.
It's important to note here that the dip tube on fermenting kegs is cut slightly shorter, so that the tube does not reach the very bottom of the keg, like it does for normal dispensing scenarios. When dispensing liquids (syrup or beer) out of kegs, you want every last drop, but when racking fermented beer from a fermentation vessel, you want to leave behind the layer of dead yeast, hops and grain residue that collects on the bottom. This layer on the bottom is known as "trub" (which is pronounced to rhyme with "boob", heh...), and is similar to the "lees" in wine; if we bottled that along with the beer, it would taste nasty. So the dip tube doesn't reach all the way down to the bottom, and before racking beer out of a fermenter, the brewer is careful to avoid agitating the source vessel, otherwise the trub would be disturbed, and float up into suspension in the beer, and transfer along with it when racking. This is why you'll note that I do the transfer in our laundry room, where I ferment my beer (since it's warm and normally dark), i.e. rather than bringing the fermenter to the bucket, I bring the bucket to the fermenter.
While the racking is going on, I add my cooled priming sugar solution, so that it mixes with the beer as much as possible. Once racking is complete, I move the bottling bucket to where I'm bottling (my kitchen, typically), and place it on a counter, because I'll be using a gravity-driven siphon to do my bottling.
My drained bottles then go into buckets or bins, which are then placed on towels on the floor. The bottles need to be below the counter level for the siphon to maintain. I use the buckets or bins to catch any beer that overflows the bottles, or drips from the bottling wand when I move between bottles; it just makes cleanup easier, because rather than cleaning the floor, I just clean the buckets or bins.
Once I'm all ready to begin bottling, I connect up the transfer apparatus that I use for getting the beer from the bucket to the bottles. I use an auto-siphon to make it very easy to start the siphon: this device has an outer tube that rests in the fluid (with a little cap to prevent it from sucking any remaining trub from the dregs of the bucket) that has a simple one-way valve in the bottom, and then an inner tube (called a "racking cane") that can move up and down is used to pump fluid up the tube, by resistance from the one-way valve. At the top of the racking cane, we connect a hose that trails down to the bottling area, and at the end of that hose we attach a "bottling wand", which is simply a tube with a spring-loaded valve at the end of it, which opens when we press it down (onto the bottom of a bottle), and closes when we let up. This apparatus makes it relatively easy - once the siphon has been primed - to dispense beer into a bottle (by pressing the wand down against the bottom of the bottle), and yet avoids spillage when moving the wand from bottle to bottle. The auto-siphon and bottling wand are pictured below.
 Before starting the actual bottling, I use the auto-siphon to gently stir the beer in the bucket, helping to ensure a more even distribution of the priming sugar solution into the beer. If I forget to do this (as I have done on occasion), then the sugar solution, being heavier than the beer, will tend to settle to the bottom of the bucket, and since the siphon pulls from the bottom of the bucket, the first few bottles of beer would have a lot of priming sugar, whilst the last bottles would have very little. This results in inconsistent carbonation.
Starting the siphon is a lot easier with two people, as one person pumps the auto-siphon, whilst the bottling wand is held "open" by pressing it into a bottle or glass. However, on this particular day, unlike the usual routine, I had no help, so I held a pint glass in one hand with the bottling wand pressing down against the bottom, and also used that hand to steady the auto-siphon, while I used the other hand to pump the auto-siphon to prime it. It was tricky, but this was not my first time doing this, and I managed it with relative ease.
Since the start of the siphon is usually relatively violent compared to the normal flow once the siphon is established, I like to capture the first little bit of the beer into a pint glass and/or a hydrometer flask. This I put aside, as it serves two purposes: I can measure the specific gravity (thickness, essentially, which equates to how much sugar remains) of the beer, and I can also subsequently measure the flavours (erm, that would be tasting it)... In this instance, the specific gravity of the beer measured in at 1.018 units of specific gravity (water is 1.0, so higher that 1.0 is heavier than water):
Before starting the actual bottling, I use the auto-siphon to gently stir the beer in the bucket, helping to ensure a more even distribution of the priming sugar solution into the beer. If I forget to do this (as I have done on occasion), then the sugar solution, being heavier than the beer, will tend to settle to the bottom of the bucket, and since the siphon pulls from the bottom of the bucket, the first few bottles of beer would have a lot of priming sugar, whilst the last bottles would have very little. This results in inconsistent carbonation.
Starting the siphon is a lot easier with two people, as one person pumps the auto-siphon, whilst the bottling wand is held "open" by pressing it into a bottle or glass. However, on this particular day, unlike the usual routine, I had no help, so I held a pint glass in one hand with the bottling wand pressing down against the bottom, and also used that hand to steady the auto-siphon, while I used the other hand to pump the auto-siphon to prime it. It was tricky, but this was not my first time doing this, and I managed it with relative ease.
Since the start of the siphon is usually relatively violent compared to the normal flow once the siphon is established, I like to capture the first little bit of the beer into a pint glass and/or a hydrometer flask. This I put aside, as it serves two purposes: I can measure the specific gravity (thickness, essentially, which equates to how much sugar remains) of the beer, and I can also subsequently measure the flavours (erm, that would be tasting it)... In this instance, the specific gravity of the beer measured in at 1.018 units of specific gravity (water is 1.0, so higher that 1.0 is heavier than water):
 and the flavour measured in at "not bad" units of yummage...
 Once the siphon has begun, it's simply a matter of dispensing the beer into all of the bottles (or as many as we can, given how much finished beer we have). Depending on the beer, I use a mix of large (22-ounce) and small (12-ounce, single serving) bottles. The large make great gifts, and are good for tastings, whereas the small are great for individual full-glass servings.
In the end, for this small batch, I ended up with six 22-ounce bottles, and nine 12-ounce bottles, making this a "limited reserve" pumpkin ale...
Once the siphon has begun, it's simply a matter of dispensing the beer into all of the bottles (or as many as we can, given how much finished beer we have). Depending on the beer, I use a mix of large (22-ounce) and small (12-ounce, single serving) bottles. The large make great gifts, and are good for tastings, whereas the small are great for individual full-glass servings.
In the end, for this small batch, I ended up with six 22-ounce bottles, and nine 12-ounce bottles, making this a "limited reserve" pumpkin ale...
 Oh, and I had about 10 ounces left for tasting the "young" beer. It still should condition in bottles for a while, both to carbonate and to age (let the flavours mellow and combine), but even in this green state, it's not bad. Actually, I think I overdid the pumpkin spices for my taste, but it has all the right elements of a pumpkin ale, just perhaps in slight excess... It may improve with age, beers often do...
After dispensing to all of the bottles, it is then necessary to cap the bottles. I use normal crown caps: homebrewers cannot use twist-off, as the pressure of natural carbonation is too great. This requires a bottle-capper, and I use a butterfly capper like this:
Oh, and I had about 10 ounces left for tasting the "young" beer. It still should condition in bottles for a while, both to carbonate and to age (let the flavours mellow and combine), but even in this green state, it's not bad. Actually, I think I overdid the pumpkin spices for my taste, but it has all the right elements of a pumpkin ale, just perhaps in slight excess... It may improve with age, beers often do...
After dispensing to all of the bottles, it is then necessary to cap the bottles. I use normal crown caps: homebrewers cannot use twist-off, as the pressure of natural carbonation is too great. This requires a bottle-capper, and I use a butterfly capper like this:
 Capping is a lot of fun, and since it rounds out the bottling session, it's nice to have as one of the last tasks involved. For the butterfly capper, you simply place the cap on the bottle, open the capping jaws by moving the butterfly "wings" into their highest position, place the jaws on the cap, and then firmly "flap" the wings down, thus compressing the jaws, which clamps the cap into place on the top of the bottle.
Unfortunately, that's not the last task involved in bottling day, and the rest is all about cleanup... I dump the trub into a small bucket, usually along with one of my Tilt Hydrometers and perhaps a dry-hopping sock as well. To avoid yeasty buildup in our pipes, I add very hot water to the trub bucket, and continue to dilute it massively with hot water as I dump it down the drain. Then the hard part: cleaning the keg. The keg then needs to be partially disassembled (posts removed, and dip tube removed), and everything scrubbed down from the "krausen" (a mixture of hops and "beer stone" and other debris that collects during fermentation), and subjected to a strong cleaning agent (PBW, "powdered brewers wash"), and a rinse with clean water.
Then the buckets must be cleaned, and the bottling apparatus and priming sugar pot, and then everything put away. Finally, I can relax with my young beer, or better yet a previously bottled, and properly conditioned beer...
Hope this was interesting, or at least enjoyable...
#Pumpkin #ActOfGourd #Bottling #HowTo
Capping is a lot of fun, and since it rounds out the bottling session, it's nice to have as one of the last tasks involved. For the butterfly capper, you simply place the cap on the bottle, open the capping jaws by moving the butterfly "wings" into their highest position, place the jaws on the cap, and then firmly "flap" the wings down, thus compressing the jaws, which clamps the cap into place on the top of the bottle.
Unfortunately, that's not the last task involved in bottling day, and the rest is all about cleanup... I dump the trub into a small bucket, usually along with one of my Tilt Hydrometers and perhaps a dry-hopping sock as well. To avoid yeasty buildup in our pipes, I add very hot water to the trub bucket, and continue to dilute it massively with hot water as I dump it down the drain. Then the hard part: cleaning the keg. The keg then needs to be partially disassembled (posts removed, and dip tube removed), and everything scrubbed down from the "krausen" (a mixture of hops and "beer stone" and other debris that collects during fermentation), and subjected to a strong cleaning agent (PBW, "powdered brewers wash"), and a rinse with clean water.
Then the buckets must be cleaned, and the bottling apparatus and priming sugar pot, and then everything put away. Finally, I can relax with my young beer, or better yet a previously bottled, and properly conditioned beer...
Hope this was interesting, or at least enjoyable...
#Pumpkin #ActOfGourd #Bottling #HowTo